
Want to use Squarespace and Mailchimp? My favorite hack.
• This article contains affiliate links for Squarespace • I am not affiliated with Mailchimp and this advice is not endorsed by them. •

Mailchimp is still an enormously popular email marketing tool, and there’s a good chance you’re interested in connecting it with your Squarespace website.
(If you haven’t yet chosen your email provider, don’t necessarily rush in with Mailchimp: you may find there are better choices available and here’s how to decide.)
However, assuming you’re certain that you’d like to use Mailchimp, then if your website is on Squarespace, you’ve no doubt searched for how to integrate them.
And this is where you run into some problems, and why I’m sharing this “hack”.
The problems with integrating Mailchimp and Squarespace
The built-in Mailchimp integration is a premium feature on Squarespace. This means it’s available on the Squarespace Business and Commerce plans only. If you’re on the more affordable Personal plan, you might think you’re out of luck. Read on for my workaround!
Even if you’re on a qualifying Squarespace plan, when you add a newsletter block, the Squarespace instructions tell you to connect it to a new, empty Mailchimp audience. What do you do if you’ve already been gathering email addresses inside Mailchimp?
If you’re savvy with your marketing, you don’t just want a sign up form in one location on your website, you want several. Once again, there’s a setback. The Squarespace information says: “Connecting multiple forms to a single Mailchimp audience can cause several issues, including dropped form submission data and disconnection from Mailchimp. We recommend using a separate Mailchimp audience for each form or newsletter block on your site when possible.”
What?!? Of course you don’t want a separate Mailchimp audience for every time you use the form. Nor do you want precious email subscribers getting lost. That’s just crazy.
These three drawbacks were enough to send me searching for a workaround. I’ve used this many times for my custom website design clients to create a Mailchimp - Squarespace integration, and I’m happy to show you the steps here, too.
How to connect Mailchimp to Squarepace, even on the Personal price plan
Before you begin, you will need:
A Mailchimp account (any level)
A Squarespace website (any plan)
One or more email addresses to use for testing. (If you use Gmail, here’s an easy way to create free test addresses.)
1. Set up your Mailchimp list
If you’ve already been using Mailchimp for a while, then there’s nothing extra to do here. But if you’re new to Mailchimp, follow the steps to sign up for an account and set up your audience.
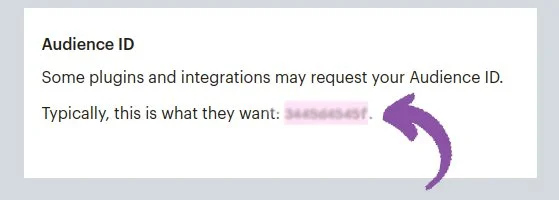
2. Find your Mailchimp Audience ID
(Mailchimp’s help on this is here)
Navigate to the Audience (list) that you want to use for the new subscribers who sign up through your website
Click All Contacts
Click Settings
Click Audience name and defaults
In the Audience ID section, make a note of the string of letters and numbers that you find. We’ll use this in Step 7, as a check.
3. Check your Audience fields (and add First Name if necessary)
My code is set up to ask new subscribers for their first name as well as their email address. So make sure your Mailchimp list will accept this.
You’re already inside your Mailchimp Audience Settings.
Click again on Settings, and this time choose Audience fields and *|MERGE|* tags
Check that your First Name field looks like this. If necessary, add a new field and make sure it’s called FNAME, like the example below:

4. Generate a sign up form in Mailchimp
Next, you’ll make a sign up form using Mailchimp. Don’t worry too much what it looks like: we’re only going to use a few key pieces of information from it, and ours will look more streamlined, too.
Navigate to Audience, Sign up forms, and click Embedded forms. (Or, this link should take you there)
The suggested form you see looks like this:

Click Continue
Mailchimp shows you the code it’s generated.
Copy this code, and paste it somewhere you can easily work with it. We’re going to use just a few snippets from here, not the whole thing.
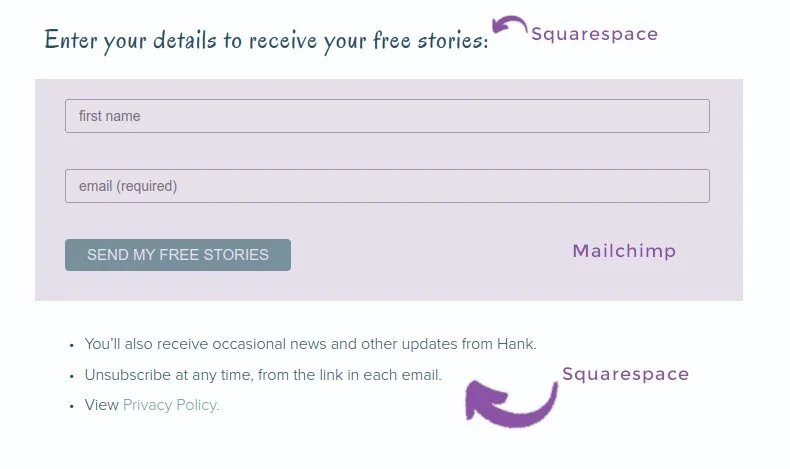
5. Add your sign up invitation text in Squarespace
Inside your Squarespace website, decide where you want your sign up form, and what you want to say. If in doubt, put this form in your Squarespace footer, so it’s visible on every page.
I like to do the bare minimum with the Mailchimp form: just first name, email address, and the Submit button.
So the accompanying text, such as why someone should sign up, what they’ll get, and a link to your privacy policy, needs to go directly onto your Squarespace page.
Related: for better email list growth, don’t simply invite them to sign up for your newsletter!
In this example, only the purple shaded area is coming from Mailchimp. The other text has been added with standard Squarespace text boxes:
6. If you don’t already know your preferred color codes, find them now
It’s a great idea to save your brand color codes in an easy reference location.
But, if you don’t already have these, inside your Squarespace website go to Design > Site Styles > Colors > Edit Palette to view your color codes:

Note down the “Hex” codes, made up of 6 numbers and letters, for your website colors, especially the one you want to use for your button color, and also the background color you’d like for your Mailchimp form.
I recommend the background color is the same as your website background, or the background of the area where the form is going to go.
(An alternative is to download the free Eye Dropper extension for Chrome. This allows you to point at colors on any web page, and click to capture their code. It’s a super handy tool!)
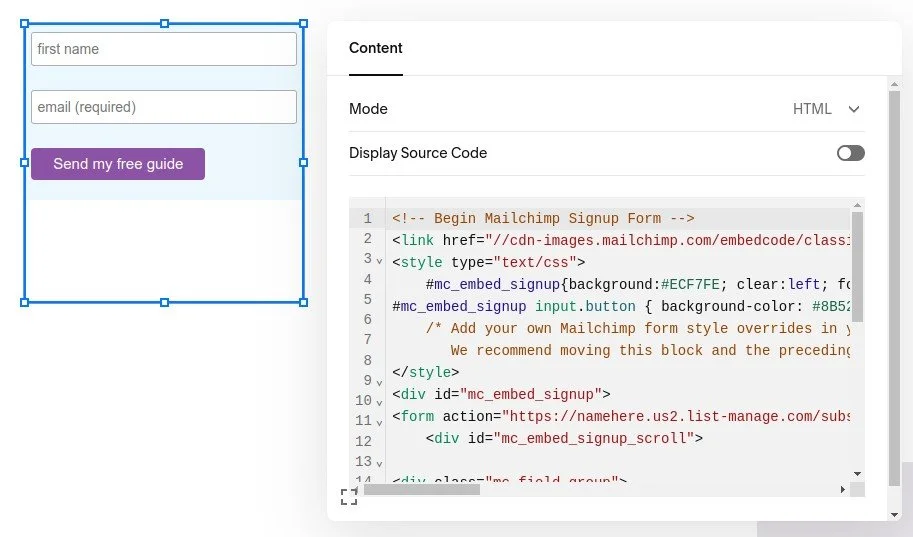
7. Edit my Mailchimp code, and replace bits with your own information
Then, replace the blue and pink parts with your own information:
The first blue code is the color you want for the background of the sign up form. This will look best if you choose the same as the background color you’re using on your website. (If the colors are not the same, you’ll get a box showing around the sign up form.)
The second blue code is the color you want for the sign up button. Again, use one of your website colors, so it coordinates.
Find the first pink text in the code that you generated in Step 4.
It starts about 9 lines down, and you need everything between the double quotes.
Replace my pink text with yours.
As a check, make sure you see your Audience ID (from Step 2) at the end of this.
Find the second pink text in the code that you generated in step 4.
It’s just below the comment that begins: Real people should not fill this in... Once again, you need the text between double quotes, after name=
Replace my pink text with yours.
As a check, make sure you see your Audience ID (from Step 2) at the end of this.
The final blue text is whatever you’d like your sign up button to say. Keep this brief. Good choices would include “Submit” or “Send my Guide”.
(Your new code doesn’t need to be colored pink and blue; these parts are just to help you find what you’re looking for.)
Hang onto the new code you just made. You’re almost ready!
8. Connect Mailchimp to Squarespace using a code block
On your Squarespace page, add a Code Block
Position it where you want the Mailchimp form to appear.
If you’re using the Fluid Engine editor in Squarespace, drag the block into place. (Don’t forget, later, to check your mobile view!)
If you’re using the older Classic editor in Squarespace, add the block where you need it, and add spacer blocks if necessary.
Edit the Code Block by clicking the pencil icon
Delete the placeholder text that says <p>Hello, World!</p> and then paste in the code you made in Step 5.
Save and publish your web page.
9. Test your new sign up form
Fill out the sign up form on your live website and check that the information reaches your Mailchimp list as expected.
You’re all set
You’re now using your Squarespace website to gather email addresses from subscribers and add them to your Mailchimp list.
This works on the Squarespace Personal plan, as well as at the higher pricing tiers. You don’t need a brand new Mailchimp list, and you can add this code in different locations on your website too. In short, it’s a great hack to work around all the limitations of the usual Mailchimp - Squarespace integration.
•
Would you like me to design and build your Squarespace author website?
Did these steps seem like a lot? This is just one piece of the “tech puzzle” that I include for my author website clients.
If you’d like technical expertise, book marketing advice, and all of the implementation taken care of, consider hiring me.
After careful preparation together, I’ll design, build and launch your site in just 2 weeks. Learn more, and then schedule our free and friendly chat.
Other resources for growing your author email list
And for the essential steps in your website project, take a look at my free 50 Step Website Checklist.